Using the Zünd Digital Knife Cutter
Material selection
The Zünd digital knife cutter has three methods for working with materials, drawing, cutting, and scoring. It can be used to work with any material that can be cut with a knife, but there are some that will work better than others. Materials are easier to cut if they are flexible and isotropic. Materials that are brittle, have a grain, or otherwise change significantly through a workpiece will be difficult to impossible to work with the Zünd cutter. The standard blade that the School of Architecture keeps in the machine has a maximum cutting depth of 3/16” or 4.8mm. If you need to cut a material thicker than that, please see an AT staff member to have them install a specialty blade.
| Easy to work | Challenging to work | Do not cut |
|
|
|
Job preparation
Assemble your geometry on 4 layers with the following names based on the role you want each type of geometry to have: Sheet, Draw, Score, and Cut.
- Sheet This layer will contain the shapes that define your sheet boundaries. You don’t need to include these, but they can be very helpful, especially in laying out multiple sheets of material simultaneously.
- Draw This layer’s geometry will be traced by the pen tool, which is by default a black ballpoint pen. Setting the exact thickness of your material will greatly improve the quality of drawn lines. Drawing with a material profile that is set too thick may keep the pen from making any contact with your material. If you want to use a different type of drawing tool, contact the AT staff.
- Score Geometry on this layer will be traced by the knife, but only pierce a percentage of the way through your workpiece. That percentage will change depending on the type of material you select. If using a material that doesn’t appear in the default material library, please consult with AT staff.
- Cut Geometry on this layer will trace out the path taken by the knife, piercing all the way through your workpiece. Thickness settings are not critical for this layer, but material profile selection will dramatically change performance. If you want to cut a material that isn’t in the default library, consult with AT staff.
The X axis on the Zünd is 48” long and the Y axis is 52” wide. These axes are oriented differently than most CAD/CAM systems. In the Zünd software, the Y axis is the horizontal on the screen, the X axis is vertical, and the origin is in the bottom right corner. Geometry modeled in Rhino, AutoCAD, or Illustrator will appear to rotate counter-clockwise 90° when sending it to the Zünd. Your geometry will look different on the screen, but it has not actually changed.
NOTE: Illustrator doesn’t treat its coordinate system in the same way as traditional CAD programs either. You’ll still see the 90° counter-clockwise rotation that you would from AutoCAD and Rhino, but the artboard will be ignored, and the origin and Y-axis will be changed.


Exporting geometry
Rhino
- Regarless of the units you modeled your geometry in, change your units to millimeters. Select Yes if you are prompted to scale your geometry as a result of changing units. Even though the Zünd software works in inches by default, it will interpret DXF files in millimeters.
- Select your geometry and use the Export command. Choose the DXF file type.
- Use the 2007 Natural export profile.
- Drag the resulting DXF file into the Zund Drop folder located on the desktop.
AutoCAD
- From the application menu click on Save As… > Other Formats.
- Select the DXF filetype in the window that appears.
- Drag the resulting file into the Zund Drop folder on the desktop.
Illustrator
- Save your work as an AI file.
- Drag the resulting file into the Zund Drop folder on the desktop.
Placing your material
Set your workpiece onto the bed. There’s no need to set them against the origin, but by default your geometry will be justified against the origin point. You can move it away from the origin by using CutEdit after pulling the job up in the CutQueue. You can place multiple sheets of material on the bed at once, but all the sheets must be of the same material and the same thickness. Trying to work with multiple thicknesses or material types simultaneously will cause poor results for at least one workpiece in the job.
NOTE: If you didn’t put your sheet boundary in your file, your geometry will be justified by default to the edge of the working are. Either move your geometry in CutEdit after loading it in the queue, or place your material at least half an inch past the X and Y axes. Cutting all the way to edge of your material, especially cutting straght lines that run parrallel to an edge of your workpiece, is very likely to shift your sheet during the cut.
Sending your geometry to the cutter
Launch CutQueue from the shortcut on the desktop. Any file you already put in the Zund Drop folder in the previous step should show up in the top pane of the CutQueue window.
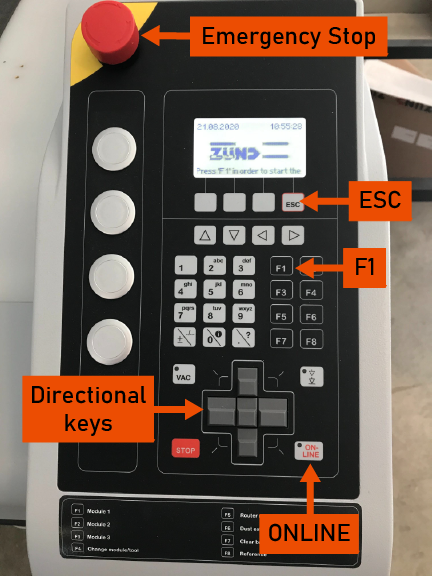
Make sure the cutter is turned on. If it isn’t, press the F1 button on the cutter’s control panel to start it. If the cutter isn’t responding to the F1 button, check the red Emergency Stop button. Gently rotate it clockwise to release it, and press the F1 button again.

If prompted to confirm the tool types on booting the cutter, press the button immediately left of the ESC button. You’ll need to do this for both the UCT in module 1 (Universal Cutting Tool) and the UDT in module 2 (Universal Drawing Tool).
Press the ONLINE button on the control panel when you’re done placing your workpieces. All movements when the Zünd is “online” are controlled by the workstation. Make sure the bed is clear of anything or anyone that may be struck by the gantry if it moves on its own.
Double-click on the job you want to send to the cutter to open it with CutCenter.
Assign a material from the library and adjust the thickness for your material if necessary. Specify your sheet size. If your sheet is irregularly shaped, or you’re unsure of the exact dimensions, under-estimate to the nearest inch. The vaccuum will adjust its area to match the dimensions you provide, maximizing the holding strength on your workpiece.
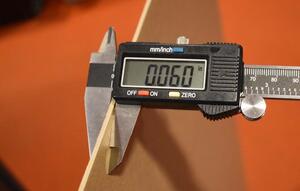
NOTE: If adjusting the thickness of your material, only make changes verified by a precise set of calipers. Be sure to check across multiple points of your workpiece and average any different thicknesses you measure. Inspect the edge of your workpiece and be sure not to measure across any damaged portions of it.

CutCenter will show a diagram of the work area. Anywhere you left-click on the work area, the gantry and head will move to, and a red laser pointer will point on the bed to show where the machine understands that point to be. You can use this to compare where your geometry will be placed on your workpiece. If you need to make adjustments, click on the E in the toolbar to open your file in CutEdit to move your geometry, or you can move your workpiece on the bed.
NOTE: If you need to move your workpiece, take the Zünd offline again. If the ONLINE LED is green, the computer still has control. If the LED is red, the control panel does. Computer moves are very fast. An accidental mouse-click could lead to serious injury. Use the directional keys on the control panel to move the gantry or head if you need to move it. Press and hold the center key with a direction key to increase the speed that the gantry and head move.
The icon to the right of the material in CutCenter specifies the direction of the flutes or grain in a material. If you are using a material like cardboard or corrugated plastic, it’s best to set this to correspond with your material. Click on the icon to rotate the direction 90°. If your material doesn’t have a grain or flutes, the direction specified here won’t impact your job.

Make sure the entire bed is clear of anything other than the workpieces you intend to use in this job. Click on the Start Job button to run your job on the Zünd. If the Start Job button has a yellow outline, there’s an issue with something regarding your selected settings. Either the material you’ve selected is too thick to be cut with the current blade, or your geometry is going past the edge of your sheets. If you need help resolving this or any other problem, please find a member of the AT staff.